Build your own raised bed vegetables
7/15/2009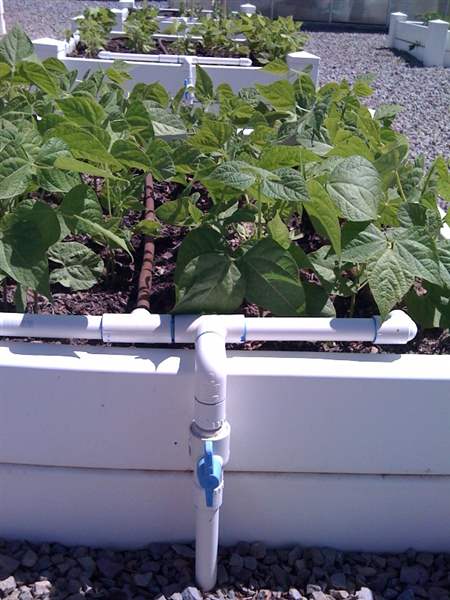
Several views of raised vegetable beds at Thanksgiving Point Farm Country in Utah.
When you pack up and fly around the country, it is easy to miss home sweet home. The lush fields of southeast Michigan and northwest Ohio, the beautiful lakes, boat rides to the islands, walks through our parks, and white-knuckle escapes to Cedar Point.
As I did some wandering in the mountains around Salt Lake City, I found a spot that would fit right in with our Midwest farm country. It is called Thanksgiving Point Farm Country.
This children's petting zoo and teaching farm has a lot of lessons to teach any budding or seasoned gardener.
I'm always looking for a way to make our landscapes more beautiful, our gardens more lush, and our workload lighter, and I found some great tricks at Thanksgiving Point: Raised beds and drip lines.

Several views of raised vegetable beds at Thanksgiving Point Farm Country in Utah.
Raised flowerbeds are very common, but don't underestimate their importance in your vegetable garden. Many materials can be used to build a raised garden. Paver stones are convenient but can be expensive. Landscape boards also are good, but be careful not to use anything that has been treated. Chemicals from the treatment process could leach into the soil and find their way into your vegetables.
I built a casual raised bed in my Temperance neighborhood many years ago with field stones and it fit the style of my garden and was filled with wonderful southeast Michigan sandy loam.
The crew at Thanksgiving Point used vinyl fence boards with very short posts to build beds about eight to 12 inches tall. The result is a clean and beautiful vegetable garden that is easy to maintain over the years.

Several views of raised vegetable beds at Thanksgiving Point Farm Country in Utah.
Once you figure out what kind of material you want to use, draw the area on the ground. Keep your beds about three feet wide and 8 to 10 feet long, or whatever your yard would permit. Any wider and it will be tough to reach across and weed them from either side. Check with your local utility companies before digging post holes, then prepare to build some raised vegetable beds.
When growing anything, you know you will need to give it some water and fertilizer. Plan ahead for this by setting up a simple irrigation system. Most plants will benefit from being watered right around the roots. Watering from the top with a sprinkler can cause wet foliage and fungus on the soil or on the leaves. A drip hose around the base of the plant works well. That is how things were set up at Thanksgiving Point Farm Country.
While digging the post holes, lines were also dug for irrigation for all of the raised beds. These lines must be at least eight to 12 inches deep to be below the frost line and to prevent them from heaving out of the ground. Like an irrigation system for your lawn, a main line was connected to the water source, then it branches off to each planting bed area. The secondary lines end at the head of each vegetable bed and are fitted with a shutoff valve, then fitted with an end fitting that will connect to a drip hose. These hoses have small holes in them and will allow a small amount of water to trickle out and water your plants right where they need them. Post holes were dug to install four regular posts, connecting two four-inch-wide fence pieces on each side of the bed.

Several views of raised vegetable beds at Thanksgiving Point Farm Country in Utah.
To keep the planting area free of weeds, the Thanksgiving Point crew filled in around the water lines with soil, then filled in the entire area with pea gravel. The water lines stand tall in front of each with their shut-off valves open and a timer turning the water on and off at the source.
Now for the fun part. Fill the raised bed with compost and clean soil. Toss in a little slow-release fertilizer and get ready to grow fruit and vegetables for your table. After your seeds start to sprout, lay the drip line around the bed evenly so all the plants get moisture. This makes for less work and a beautiful garden. I'm glad I got to see Thanksgiving Point Farm Country's work first-hand, but now I'm ready to come back home and try it myself.
For photos of this project, go to my column at toledoblade.com.
Contact Kelly Heidbreder at:
kheidbreder@theblade.com