Kids-to-kids crafts for the holidays
12/11/2002
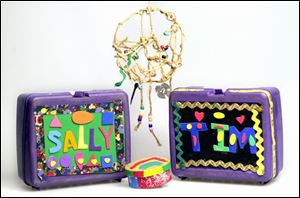
Children's holiday crafts don't have to be elaborate. Decorated lunch boxes, a dream catcher, and a small painted box are easy to do, yet have a handmade touch.
If you want to start a memorable holiday tradition, have your children create holiday gifts for each other.
No, I'm not crazy, and my kids aren't angels. My two children, a 12-year-old girl and a 9-year-old boy, often engage in pitched sibling warfare. I'm also not a natural arts-and-crafts person. Yes, I enjoy this type of activity, but "simple, easy, and quick'' is my motto. Any craft project that calls for days of work, loads of materials, or artistic talent is out, as far as I'm concerned.
Despite these limitations, I annually manage to persuade my children to create unique, handmade gifts for each other. To me, a handmade gift, even if it's something simple and quickly created, is preferable to some store-bought toy or other gizmo. Doing these crafts also is a great way to spend some quality time with your children during the frenzied holiday season.
How do I get my kids to make gifts for each other? I try to make it fun and fast. Lots of handmade gifts that can be created in an hour or less by personalizing everyday objects like wooden picture frames, pottery mugs, light-switch covers, and even wastebaskets. (My son glued craft-foam letters onto a wastebasket last year to make a unique - and useful - gift for his sister.)
Another trick is to have your children use an art kit to create their sibling gifts. Numerous art kits manufactured by Creativity For Kids, Curiosity Kits, and Klutz can be found at specialty toy stores as well as some chain stores.
With the kits, which include project materials, my children have created all kinds of gifts for each other, including dream catchers, fancy photo frames, and tiny wooden "bureaus'' for holding coins and jewelry. This year, there are kits for personalizing silk scarves, miniature metal lockers, and a "paint your own butterfly chair."
But you don't need a kit for your children to create interesting sibling gifts. Here are some other possibilities, most inspired by FamilyFun magazine:
Materials: Old plastic lunchbox, craft foam in various colors, rickrack and/or ribbon, flat buttons of various colors, craft glue, scissors.
Directions: Wash the outside of the lunchbox to get it as clean as possible. Let it dry. Cut a piece of craft foam to fit the middle of the front and back of the lunchbox, so that it will cover whatever design is there. Glue it in place. Then let your imagination go wild as you decorate the rest of the lunchbox.
For example, my children cut letters out of different colors of craft foam to spell their sibling's name and glued them into the middle of the lunchbox's front. Then they glued ribbon around the edges of the lunchbox, and added buttons on top of that.
When the glue has dried, fill up the lunchbox with simple sewing supplies: tape measure, pin cushion filled with pins, a pack of sewing needles, and various spools of thread. (Obviously, this gift is intended for a child older than 3.)
Materials: Inexpensive soft-cover photo album (which has slots for up to 20 pictures), family photos, markers, unruled index cards (either white or colored). Make sure the index cards will fit in the photo slots.
Directions: Sort through your family photos to find ones that show the gift-maker with his or her sibling. Look especially for photos that could be used to tell a story (for example, a big sister feeding her infant brother). Choose enough photos to fill half of the photo slots in the album (for example, 10 photos, if there are 20 slots). Have your child think of what kind of story the photos could tell about one child's relationship with a sibling, such as how the younger likes to do the things an older brother or sister does.
Gather enough index cards to fill the other half of the photo slots, plus a "title page." Think of a title for the photo book, write this on an index card, and put it in the first slot in the photo album. Turn the page and put a photo on one side, and an index card with a small bit of "text" to tell the story on the other side. (Try to get your child to come up with the "text," if possible). Continue this until the book is complete. If you want, create a special cover for the album.
Materials: Plain canvas tote bag or apron, fabric markers (best bet for toddlers and preschoolers) or fabric paints, large piece of cardboard. (Plain canvas tote bags are usually available at craft stores. Also, Sharpie permanent markers, available at office-supply stores in a range of colors, can be used instead of fabric markers).
Directions: Place the piece of cardboard between the two sides of the tote, or under the apron so markers don't bleed through. Let your child decorate the tote or apron with the markers or paints. One caution: Fabric markers and paints are permanent, so make sure the child is wearing old clothes when doing this project.
Older children might like to add some flourishes with raised fabric paint, also available in craft stores.
T-shirts and sweatshirts also can be personalized.